Showing posts with label Math. Show all posts

Wednesday, April 26, 2017

More DIY materials: The teens and tens board

The first number concepts are very difficult to grasp for young children, and I have found that, as with all the materials that form part of the Montessori Math apparatus, this particular item has has been amazingly useful and effective in introducing place value.

First, here is what it looks like in Montessori classrooms (This materials can be found at alisonsmontessori.com):

Teens board
Tens board


And here is how you use them to present the concepts.


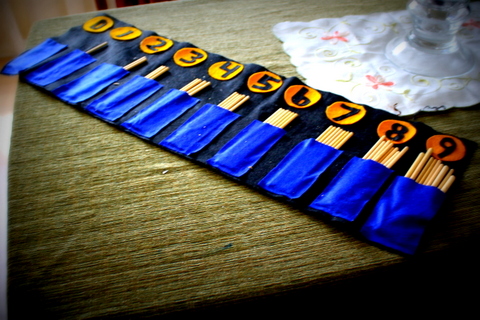
Now, my DIY version took only a few minutes to make, and I have used it with my three children over a period of five years... It is durable, and takes up very little space, which makes it ideal for the home environment.

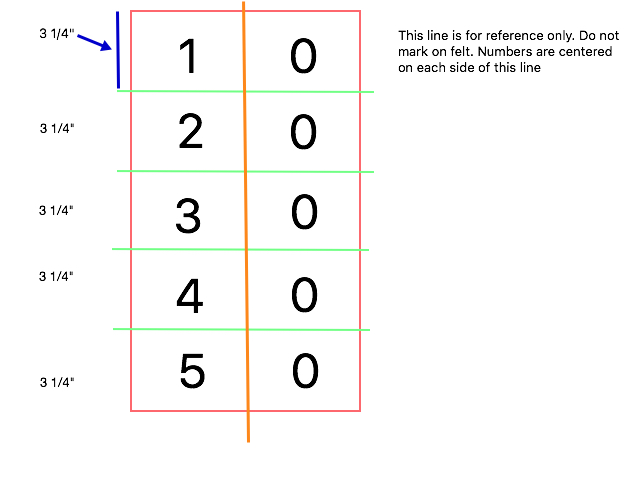
Cut 4 tan felt rectangles, approximately 16" by 6"
Cut 16 tan felt strips, 1/4" by 6"
Cut 18 tan felt rectangles, 2 1/4" by 2"

Now the assembly part:

Follow this diagram to divide each 16" by 6" rectangle in five portions. Mark the horizontal lines with a pencil.

Using felt glue or a glue gun, attach one strip of felt on each horizontal line. Repeat with each 16" by 6" rectangle.


Now, with a Black Sharpie, proceed to write the numbers (centered on each column) as follows:

For the TEENS BOARD

Board 1:

Mark the individual rectangles 1 to 9. These are going to be your movable parts.

For the TENS BOARD


Mark the individual rectangles 1 to 9. These are going to be your movable parts.


And you are done :)


Tuesday, August 5, 2014

Math materials III - Checkers board

The checkerboard belongs to the Montessori elementary material, and is aimed at children in the 6-9 classroom. Its main focus is on long multiplication.

We have just introduced it in our home, and it was a big success.

Here is a video of how to use the board that I found quite useful:


My DIY version is made using very simple materials, namely felt and adhesive felt, also known as presto felt.

I bough mine at Joanne's but I am sure Michaels and other crafts stores have it too.They come in individual 8" x 11" sheets, so you can buy exactly what you need for a few dollars.

Basically I cut a 22" by 11" rectangle of blue felt,  which doubles as a base and the blue squares in the board. After that I cut 12 green squares and 12 red squares, all measuring 2 1/4" x 2 1/4" in presto felt.

Using a picture as a model, I simply stuck them in order. Although not absolutely necessary, I use think strips of black presto felt to make a border around the board. Finally, I wrote the numbers corresponding to each column and row with a Sharpie.

Here is a graphic representation of how the board should look like:


This is our version:


An added benefit of the felt is that the beads do not roll on it so easily, so it helps the child keep everything in place, especially in very long multiplications.

As you have probably noticed, my beads do not follow the same color code as the original Montessori materials, but they were what I could get at the time I made them, and we have been using them successfully for five years now. :)

Wednesday, April 23, 2014

Math materials part II

Addition strips board

This is another Math material I made years ago, which has been used countless times and has hold its own, even though I just used glossy heavy cardstock.

If you prefer, you can buy the already made printable through Montessori for everyone or Montessori print shop. Or just make your own using the pictures on those websites as a guide.

Here is a video lesson on how to introduce this material:


Wednesday, April 16, 2014

Math materials made at home part 1

 These are some of the Montessori Math materials we have adapted for our family. We have been using them all the time for a few years now, and they proved to be quite durable and fun.

RODS

Our Rods are made with 1/2" craft dowels, which I painted with acrylic. Since the dowels were 10" long, I used inches as the unit of measurement for them. They are quite smaller than the real rods, but our space is limited, so I compromised. :) Children really love these!!


COUNTING MATERIALS

One that was really popular with all three children when learning their numbers was the counting work. I simply provided them with a box containing the numerals from 1 to 9 in laminated card-stock, the corresponding number of pennies to complete the work (45) and the beads. Our beads do not follow the same color code as the traditional Montessori beads, but we have kept the consistency within our our materials and extensions.

Tuesday, March 18, 2014

Rods

Cuisenaire rods were devised in the 1920s by Georges Cuisenaire, a Belgian educator. Similar to how written musical notes make music visible, Cuisenaire rods were designed to make mathematics visible by using wood rods of varying lengths and colour.*

In her first school, and in schools since then, Maria Montessori used coloured rods in the classroom to teach concepts of both mathematics and length. Developed independently much later, the Cuisinaire Rods are neverless a kindred spirit to the ones used in the Monressori classrooms.

 They are extremely versatile. I have been using them for all my kids, and they become handy to explain basic numeric concepts and not so basic ones...like fractions, factoring, etc. But of course my children also saw the building possibilities... so we also use them for geometry and history.

 And I can't wait to use them for grammar, and music, too. (Cuisenaire himself was a math and music teacher)

Here are some of their creations so far:


 On a related note, this is what happens when a boy uses the sensorial materials :)


Tuesday, July 23, 2013

Homeschool Enrichment

If you are looking for inspiration and ideas for this upcoming year, here is a great homeschooling magazine, Homeschool Enrichment, which is offering for a limited time a pdf download of all their 2012 issues... find the link below

http://homeschoolenrichment.com/goodies/all-issues-of-hse-magazine-from-2012


Monday, September 17, 2012

Art extension for metal insets

A while ago we purchase some metal insets at discount prices, and after using them following the Montessori album pages, we started experimenting a bit with them in our art classes.

So what follows is an activity that combines the metal insets with a little play of straight lines vs curved lines in order to create a 3D optical illusion. (This can also be associated with a discussion/lesson on the science behind optical illusion.) For even more examples of this phenomenon you can see here and here and here ...

So the first step is to choose a metal inset (or any other shape that can be traced on paper) and place it on a white piece of paper. Trace around.


With a ruler trace horizontal parallel lines on the page, excluding the shape you have just traced. This gives the child quite a bit of practice with the ruler, too :)


Now the tricky part: using the points of contact of the lines with the edge of the figure as a starting and finishing point, trace an arch joining these two points. Again, it does not have to be perfect, but this first line is going to be the guide for all the other curves inside the figure, so you can actually help the child by tracing a couple and explaining that we still need to keep them parallel.


Once all the lines are traced, you are ready to colour. I made my children create their own color pattern, but it can also be just random. They can get creative there.


After all the stripes are fill in with colour, you can enjoy the effect!


This is very simple, but quite rewarding, even as an introduction to the concepts of perspective and any type of "applied" optical illusion in art and architecture.

Tuesday, April 10, 2012

Portable spindle "box"

This is my version of the Montessori Spindle box, (you can see how this material is used here) which allows children to learn to count to 10, and to learn the symbols for each number.


Ok. Technically I did not use spindles. And it is not a box. But it works!!! What I love about it is that it is portable,takes 30 minutes to be made, and achieves the same results!! :)

All you need is felt, scissors and a glue gun. (and the 7" spindles/sticks/ of your choice = 45 of them :))


Basically you glue ten 3" x  6 " pockets onto a felt 50" x 10 " felt rectangle. Cut out the numbers in felt and glue on top. That's it :)

Use a ribbon to tie it up (or any method you feel appropriate for your child to use independently) and make a 4" by 6" felt pouch to store the sticks.