Showing posts with label DIY. Show all posts

Wednesday, April 26, 2017

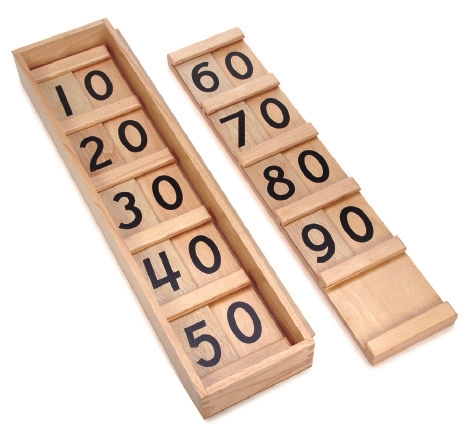
More DIY materials: The teens and tens board

The first number concepts are very difficult to grasp for young children, and I have found that, as with all the materials that form part of the Montessori Math apparatus, this particular item has has been amazingly useful and effective in introducing place value.

First, here is what it looks like in Montessori classrooms (This materials can be found at alisonsmontessori.com):

Teens board
Tens board


And here is how you use them to present the concepts.


Now, my DIY version took only a few minutes to make, and I have used it with my three children over a period of five years... It is durable, and takes up very little space, which makes it ideal for the home environment.

Cut 4 tan felt rectangles, approximately 16" by 6"
Cut 16 tan felt strips, 1/4" by 6"
Cut 18 tan felt rectangles, 2 1/4" by 2"

Now the assembly part:

Follow this diagram to divide each 16" by 6" rectangle in five portions. Mark the horizontal lines with a pencil.

Using felt glue or a glue gun, attach one strip of felt on each horizontal line. Repeat with each 16" by 6" rectangle.


Now, with a Black Sharpie, proceed to write the numbers (centered on each column) as follows:

For the TEENS BOARD

Board 1:

Mark the individual rectangles 1 to 9. These are going to be your movable parts.

For the TENS BOARD


Mark the individual rectangles 1 to 9. These are going to be your movable parts.


And you are done :)


Monday, August 8, 2016

Art History, the big Story approach

As my children are transitioning towards Elementary/Middle School, I am trying to apply some of the Montessori Elementary principles to what we do, going from manipulative/concrete to abstract and big picture.

This approach is working particularly well in the study of Art. Rather than approaching different techniques in random order, we are following a small booklet, "The Child's History of Painting", which is a simplified narration of the evolution of art, with plenty of activities related to each moment.

It gives children the big picture, in the same way "The History of the Hand" and "The History of Writing" do in the Five Great Lessons, and it helps them understand art in context, within its historical times.

I  usually start with the activities suggested in the book, but I also like to incorporate my own.

Here is an example of a fun activity we came up with, in which we combined history, art and a little bit of craftsmanship by a cool DIY scratch art paper medium.


The subject is Ancient Greece, more especifically the Red Figure and Black Figure in pottery.

In order to reproduce the effect, we simply created a scratch paper using only red orange crayon for the Red figure  and use red orange card stock for the Black Figure.

The Red -figure inspired vases

The Black-Figure inspired vases


When placed side by side, the effect is quite striking, and it helps understand the details involved in the change of background for each style.


Tuesday, August 5, 2014

Math materials III - Checkers board

The checkerboard belongs to the Montessori elementary material, and is aimed at children in the 6-9 classroom. Its main focus is on long multiplication.

We have just introduced it in our home, and it was a big success.

Here is a video of how to use the board that I found quite useful:


My DIY version is made using very simple materials, namely felt and adhesive felt, also known as presto felt.

I bough mine at Joanne's but I am sure Michaels and other crafts stores have it too.They come in individual 8" x 11" sheets, so you can buy exactly what you need for a few dollars.

Basically I cut a 22" by 11" rectangle of blue felt,  which doubles as a base and the blue squares in the board. After that I cut 12 green squares and 12 red squares, all measuring 2 1/4" x 2 1/4" in presto felt.

Using a picture as a model, I simply stuck them in order. Although not absolutely necessary, I use think strips of black presto felt to make a border around the board. Finally, I wrote the numbers corresponding to each column and row with a Sharpie.

Here is a graphic representation of how the board should look like:


This is our version:


An added benefit of the felt is that the beads do not roll on it so easily, so it helps the child keep everything in place, especially in very long multiplications.

As you have probably noticed, my beads do not follow the same color code as the original Montessori materials, but they were what I could get at the time I made them, and we have been using them successfully for five years now. :)

Wednesday, April 23, 2014

Math materials part II

Addition strips board

This is another Math material I made years ago, which has been used countless times and has hold its own, even though I just used glossy heavy cardstock.

If you prefer, you can buy the already made printable through Montessori for everyone or Montessori print shop. Or just make your own using the pictures on those websites as a guide.

Here is a video lesson on how to introduce this material:


Thursday, April 17, 2014

Easter Eggs


This week we have decided to explore the wonderful tradition of Easter Eggs and its rich symbolism and history.


Eggs, in general, were a traditional symbol of fertility, and rebirth. But in Christianity they assume a deeper meaning: they symbolize the empty tomb of Jesus:  though an egg appears to be like the stone of a tomb, a bird hatches from it with life; similarly, the Easter egg, for Christians, is a reminder that Jesus rose from the grave, and that those who believe will also experience eternal life. Eggs, while being dormant, contain a new life sealed within them, becoming a wonderful symbol of the Resurrection.

The Easter egg tradition may also have merged into the celebration of the end of the privations of Lent in the West. Historically, it was traditional to use up all of the household's eggs before Lent began. Eggs were originally forbidden during Lent as well as on other traditional fast days in Western Christianity (this tradition still continues among the Eastern Christian Churches).

One would have been forced to hard boil the eggs that the chickens produced so as not to waste food, and many traditional Easter dishes bear witness to that, having egg as the main ingredient.
  
Decorating and gifting (empty) eggs is an old tradition, particularly in Bulgaria, Poland, Romania, Russia, Ukraine, and other Central European countries.

Here are some examples:


So, after learning about them, we made our own. First, I followed the instructions on this video to empty the eggs. My children were absolutely fascinated by the process… 


After that we viewed many examples of this art on the Internet, you can use this gallery for reference. 

We discussed how each look like, the differences among them, and picked our favourites.

Then, with the help of sharpies, small icon pictures from a catalog, and some acrylic paint, we all made our own.  


We finished them with a thin coat of school glue and when they were dried I made a base for them to stand on. 

I used a penny and attached it to the egg with a small ball of modelling clay (approximately the size of a garbanzo bean) by gently squeezing them together. When the clay dried I painted it gold. 

You can also use a generous amount of glue applied with a glue gun to attach the coin.


Have a Blessed Easter!

Wednesday, April 16, 2014

Math materials made at home part 1

 These are some of the Montessori Math materials we have adapted for our family. We have been using them all the time for a few years now, and they proved to be quite durable and fun.

RODS

Our Rods are made with 1/2" craft dowels, which I painted with acrylic. Since the dowels were 10" long, I used inches as the unit of measurement for them. They are quite smaller than the real rods, but our space is limited, so I compromised. :) Children really love these!!


COUNTING MATERIALS

One that was really popular with all three children when learning their numbers was the counting work. I simply provided them with a box containing the numerals from 1 to 9 in laminated card-stock, the corresponding number of pennies to complete the work (45) and the beads. Our beads do not follow the same color code as the traditional Montessori beads, but we have kept the consistency within our our materials and extensions.

Tuesday, February 19, 2013

Tangram fun!

The tangram (Chinese: "seven boards of skill") is a dissection puzzle consisting of seven flat shapes, called tans, which are put together to form shapes. The objective of the puzzle is to form a specific shape (given only an outline or silhouette) using all seven pieces, which may not overlap. It was originally invented in China at some unknown point in history, and then carried over to Europe by trading ships in the early 19th century. It became very popular in Europe for a time then, and then again during World War I. It is one of the most popular dissection puzzles in the world
(From Wikipedia)

We just love tangram... it can be quite easy or quite challenging, and it just provides a wonderful fun way to improve geometrical perception.
These are some of the shapes you can build...I have a book that boasts +6000 combinations, with the corresponding "solution", so it is a self correcting work that allows children to work independently... I am going to make some cards to share soon...


But let's start with the set itself.

I have a black plastic Tangram set, but my children each wanted their own, so made a very simple one with black construction paper that has been previously laminated.

You can basically use any material you want, from  cereal boxes to wood, of any size you want. All you need to do is start with a square.

Step 1
Draw a square of at least 8" x 8"

Step 2

Step 3
Step 4


Step 5

Step 6

Step 7

Step 8


Thursday, February 7, 2013

Play time!


A good introduction to the dramatic art, this role play can take place in a mini theater made out of cardboard... See here


Make this strongman dance! Or play with a mermaid, the Big Bad Wolf, Little Red Ridinghood, a very charming Prince or the Fairy Princess!

Download the Theater printable here
(pdf contains 3 A4 pages, 872 kb)


What we did with ours:

- Print in color

- Stick to cardboard (cereal box will work)

- Laminate

- Cut each piece leaving a 2 mm margin

- Join with butterfly clips at joints

- Play!!! :)It is interesting how many stories come from this eclectic mix of characters...

 Can't wait for the next one!! I'll keep you posted!!

Tuesday, February 5, 2013

Drawing with children

I found the book by Mona Brooks, "Drawing with children", very inspiring, since it introduces children to drawing in a very gentle and systematic way, training the eye to see detail in order to be able to draw better.

In her next book, "Drawing with older children and teens" she explores the ideas further. I really enjoyed the way copying doodles help to train the eye, and even foster new tools for creativity.


That is why I've created my own doodles for my children, and I am sharing the file  . Please for personal use only, thank you! You will find 3 pages of designs to copy, plus a blank page at the end to incorporate your own. I truly believe children enjoy things better (and learn more) if they see us enjoying it, too :)


Wednesday, September 12, 2012

Paper paper paper

Many Montessori materials, at least here in the US, include 3D realistic depictions of objects of interest going from famous buildings and landmarks to means of transport to wildlife. It is a bit challenging (not to mention expensive or prohibitive) to reproduce that at home, but I have found this website has a nice alternative: print your own 3D (scaled!) models and build them at home. All you need is a color printer, some paper and a pair of scissors and glue. OK, and lots of patience, but it is really a great project to "illustrate" any lesson.

Here is the link: 3D paper models

Check out some examples:


We are currently working on this one:


Monday, April 23, 2012

Earth Day

What is the best way to celebrate Earth day? Well, building a terrarium, of course!!! :) :)
My children are eager to have a pet, but since it would not work right now, they have happily "adopted" several pill bugs and snails from the garden... They are actually feeding them everyday, and making sure they have enough water, so the little bugs are thriving....

We made our little "home" for the creatures with a clear Dollar store shoe box, some mosquito net, a cutter and the glue gun. It is very sturdy and it can be reused many times...


Enjoy a nice, relaxing nature walk!!

Tuesday, April 10, 2012

Portable spindle "box"

This is my version of the Montessori Spindle box, (you can see how this material is used here) which allows children to learn to count to 10, and to learn the symbols for each number.


Ok. Technically I did not use spindles. And it is not a box. But it works!!! What I love about it is that it is portable,takes 30 minutes to be made, and achieves the same results!! :)

All you need is felt, scissors and a glue gun. (and the 7" spindles/sticks/ of your choice = 45 of them :))


Basically you glue ten 3" x  6 " pockets onto a felt 50" x 10 " felt rectangle. Cut out the numbers in felt and glue on top. That's it :)

Use a ribbon to tie it up (or any method you feel appropriate for your child to use independently) and make a 4" by 6" felt pouch to store the sticks.