Wednesday, April 26, 2017

More DIY materials: The teens and tens board

The first number concepts are very difficult to grasp for young children, and I have found that, as with all the materials that form part of the Montessori Math apparatus, this particular item has has been amazingly useful and effective in introducing place value.

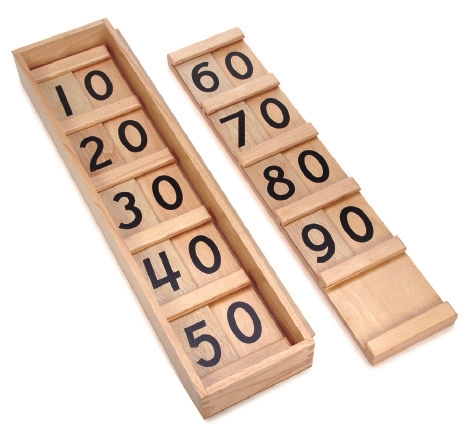
First, here is what it looks like in Montessori classrooms (This materials can be found at alisonsmontessori.com):

Teens board
Tens board


And here is how you use them to present the concepts.


Now, my DIY version took only a few minutes to make, and I have used it with my three children over a period of five years... It is durable, and takes up very little space, which makes it ideal for the home environment.

Cut 4 tan felt rectangles, approximately 16" by 6"
Cut 16 tan felt strips, 1/4" by 6"
Cut 18 tan felt rectangles, 2 1/4" by 2"

Now the assembly part:

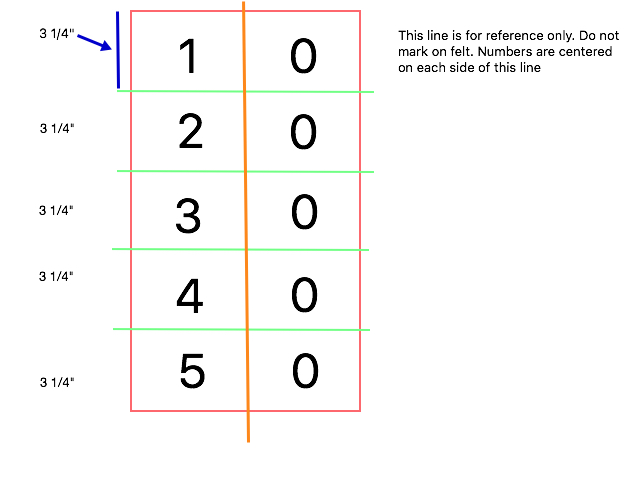
Follow this diagram to divide each 16" by 6" rectangle in five portions. Mark the horizontal lines with a pencil.

Using felt glue or a glue gun, attach one strip of felt on each horizontal line. Repeat with each 16" by 6" rectangle.


Now, with a Black Sharpie, proceed to write the numbers (centered on each column) as follows:

For the TEENS BOARD

Board 1:

Mark the individual rectangles 1 to 9. These are going to be your movable parts.

For the TENS BOARD


Mark the individual rectangles 1 to 9. These are going to be your movable parts.


And you are done :)


Monday, August 8, 2016

Art History, the big Story approach

As my children are transitioning towards Elementary/Middle School, I am trying to apply some of the Montessori Elementary principles to what we do, going from manipulative/concrete to abstract and big picture.

This approach is working particularly well in the study of Art. Rather than approaching different techniques in random order, we are following a small booklet, "The Child's History of Painting", which is a simplified narration of the evolution of art, with plenty of activities related to each moment.

It gives children the big picture, in the same way "The History of the Hand" and "The History of Writing" do in the Five Great Lessons, and it helps them understand art in context, within its historical times.

I  usually start with the activities suggested in the book, but I also like to incorporate my own.

Here is an example of a fun activity we came up with, in which we combined history, art and a little bit of craftsmanship by a cool DIY scratch art paper medium.


The subject is Ancient Greece, more especifically the Red Figure and Black Figure in pottery.

In order to reproduce the effect, we simply created a scratch paper using only red orange crayon for the Red figure  and use red orange card stock for the Black Figure.

The Red -figure inspired vases

The Black-Figure inspired vases


When placed side by side, the effect is quite striking, and it helps understand the details involved in the change of background for each style.


Thursday, May 14, 2015

Doll houses and creative juices

A few years ago my children got a beautiful doll house made of natural wood, and I was so excited... I love natural wood toys, and this one was particularly well made. But after playing for a little while (like, two hours) they never went back to it again...

I was puzzled, and attributed to the fact that boys and miniature houses maybe are not a good fit... until my 6 year old son started his "house project." He was so excited he worked on it for days. He would wake up in the morning with all these ideas he wanted to incorporate into his project, and it has been so rewarding for him. He shows it to everyone that comes to our house, and he always says (with a very happy look): "It's all homemade".


I learned my lesson... at least for my kids, the capacity to transform common things into something else is deeply satisfying, and giving them the final product is not necessarily what will inspire them to create.


Tuesday, March 3, 2015

Icon writing

Our Art History class for today

I have been searching for a good video to show the process of icon writing, and this one is one of the best.


Monday, January 26, 2015

A new art project

After working with Mona Brookes' book "Drawing with children" for a little while, we were searching for new challenges, and we discovered these wonderful step by step drawing videos on You Tube. They are very clear, with no talking at all, and can be followed very easily, at one's own pace. They are focused on drawing animals, but there is such a large variety that there is something for every taste.

This is what my 9 year old draw in around 20 minutes...


Here is a link to the tutorial video:


You can see the rest of the videos here

Friday, October 17, 2014

An alternative to narration

Narration is a very useful tool when it comes to reinforcing and understanding certain ideas with younger children. It basically consists of the retelling of a text by the younger child. It helps them organize ideas, grasp the gist, and differentiate between important facts and anecdotes.

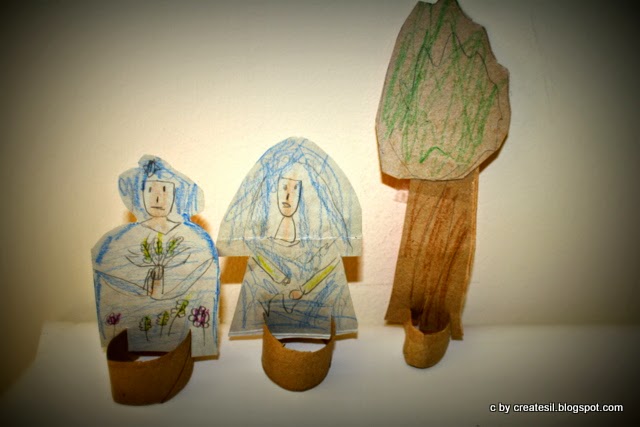
But it can get a bit repetitive and yes, boring, over time. To keep our interest high, we sometimes recreate the story with home made cardboard figures. A few cereal boxes, some color pencils and a bit of imagination, and a child is ready to present the story in a more dramatic way. It's history, drawing and performing arts all in one. And it is FUN!!

Here is our latest, depicting

The Myth of Ceres and Proserpine


Casting:

Ceres & Proserpine


Pluto, the king of the Underworld


Jupiter himself, in his palace....


Tuesday, September 30, 2014

Writing

I am always searching for new ways to incorporate handwriting to our day, and this time I found a fun one for Kinder age kids... The idea is quite simple, but it works wonders, especially with children that are a bit bored of the paper and pencil approach.

All you need is a blackboard, some chalk, a container with water and a brush.

The aim is for the child to "erase" the letters by tracing them using the brush and water.


Simple. Fun. Quite effective. :)


Tuesday, August 5, 2014

Math materials III - Checkers board

The checkerboard belongs to the Montessori elementary material, and is aimed at children in the 6-9 classroom. Its main focus is on long multiplication.

We have just introduced it in our home, and it was a big success.

Here is a video of how to use the board that I found quite useful:


My DIY version is made using very simple materials, namely felt and adhesive felt, also known as presto felt.

I bough mine at Joanne's but I am sure Michaels and other crafts stores have it too.They come in individual 8" x 11" sheets, so you can buy exactly what you need for a few dollars.

Basically I cut a 22" by 11" rectangle of blue felt,  which doubles as a base and the blue squares in the board. After that I cut 12 green squares and 12 red squares, all measuring 2 1/4" x 2 1/4" in presto felt.

Using a picture as a model, I simply stuck them in order. Although not absolutely necessary, I use think strips of black presto felt to make a border around the board. Finally, I wrote the numbers corresponding to each column and row with a Sharpie.

Here is a graphic representation of how the board should look like:


This is our version:


An added benefit of the felt is that the beads do not roll on it so easily, so it helps the child keep everything in place, especially in very long multiplications.

As you have probably noticed, my beads do not follow the same color code as the original Montessori materials, but they were what I could get at the time I made them, and we have been using them successfully for five years now. :)

Wednesday, April 23, 2014

Math materials part II

Addition strips board

This is another Math material I made years ago, which has been used countless times and has hold its own, even though I just used glossy heavy cardstock.

If you prefer, you can buy the already made printable through Montessori for everyone or Montessori print shop. Or just make your own using the pictures on those websites as a guide.

Here is a video lesson on how to introduce this material:


Thursday, April 17, 2014

Easter Eggs


This week we have decided to explore the wonderful tradition of Easter Eggs and its rich symbolism and history.


Eggs, in general, were a traditional symbol of fertility, and rebirth. But in Christianity they assume a deeper meaning: they symbolize the empty tomb of Jesus:  though an egg appears to be like the stone of a tomb, a bird hatches from it with life; similarly, the Easter egg, for Christians, is a reminder that Jesus rose from the grave, and that those who believe will also experience eternal life. Eggs, while being dormant, contain a new life sealed within them, becoming a wonderful symbol of the Resurrection.

The Easter egg tradition may also have merged into the celebration of the end of the privations of Lent in the West. Historically, it was traditional to use up all of the household's eggs before Lent began. Eggs were originally forbidden during Lent as well as on other traditional fast days in Western Christianity (this tradition still continues among the Eastern Christian Churches).

One would have been forced to hard boil the eggs that the chickens produced so as not to waste food, and many traditional Easter dishes bear witness to that, having egg as the main ingredient.
  
Decorating and gifting (empty) eggs is an old tradition, particularly in Bulgaria, Poland, Romania, Russia, Ukraine, and other Central European countries.

Here are some examples:


So, after learning about them, we made our own. First, I followed the instructions on this video to empty the eggs. My children were absolutely fascinated by the process… 


After that we viewed many examples of this art on the Internet, you can use this gallery for reference. 

We discussed how each look like, the differences among them, and picked our favourites.

Then, with the help of sharpies, small icon pictures from a catalog, and some acrylic paint, we all made our own.  


We finished them with a thin coat of school glue and when they were dried I made a base for them to stand on. 

I used a penny and attached it to the egg with a small ball of modelling clay (approximately the size of a garbanzo bean) by gently squeezing them together. When the clay dried I painted it gold. 

You can also use a generous amount of glue applied with a glue gun to attach the coin.


Have a Blessed Easter!

Wednesday, April 16, 2014

Math materials made at home part 1

 These are some of the Montessori Math materials we have adapted for our family. We have been using them all the time for a few years now, and they proved to be quite durable and fun.

RODS

Our Rods are made with 1/2" craft dowels, which I painted with acrylic. Since the dowels were 10" long, I used inches as the unit of measurement for them. They are quite smaller than the real rods, but our space is limited, so I compromised. :) Children really love these!!


COUNTING MATERIALS

One that was really popular with all three children when learning their numbers was the counting work. I simply provided them with a box containing the numerals from 1 to 9 in laminated card-stock, the corresponding number of pennies to complete the work (45) and the beads. Our beads do not follow the same color code as the traditional Montessori beads, but we have kept the consistency within our our materials and extensions.

Thursday, April 3, 2014

Field trips: The Ocean Institute

We love field trips. There are so many wonderful places where you can learn, and have tons of fun. Here are some of the pictures of our visit to the Ocean Institute in Dana Point. The place is not that big, which is a plus since we did not have that weird, awful  "too little time, too much to see" feeling that sometimes accompanies going anywhere in California.

There were plenty of hands-on activities:

Dissecting and studying a squid


Looking at plankton with a microscope


Watching interesting creatures

Just outside the Institute we also had a wonderful time searching for crabs, enjoying the view, and searching for treasures at the beach.


Here is the information about the Ocean Institute:

Ocean Institute: Experience is the teacher

Have fun and learn!!

Tuesday, March 18, 2014

Rods

Cuisenaire rods were devised in the 1920s by Georges Cuisenaire, a Belgian educator. Similar to how written musical notes make music visible, Cuisenaire rods were designed to make mathematics visible by using wood rods of varying lengths and colour.*

In her first school, and in schools since then, Maria Montessori used coloured rods in the classroom to teach concepts of both mathematics and length. Developed independently much later, the Cuisinaire Rods are neverless a kindred spirit to the ones used in the Monressori classrooms.

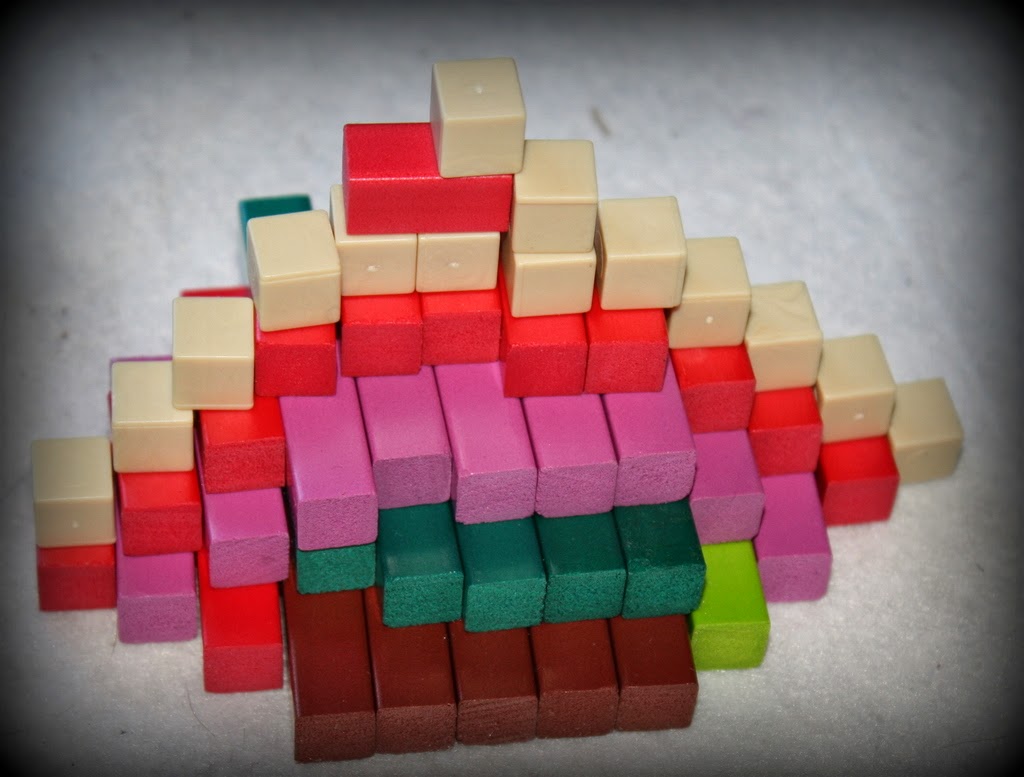
 They are extremely versatile. I have been using them for all my kids, and they become handy to explain basic numeric concepts and not so basic ones...like fractions, factoring, etc. But of course my children also saw the building possibilities... so we also use them for geometry and history.

 And I can't wait to use them for grammar, and music, too. (Cuisenaire himself was a math and music teacher)

Here are some of their creations so far:


 On a related note, this is what happens when a boy uses the sensorial materials :)